Sunday, December 26, 2010

" 'Twas the day after Christmas...

...and all through the place, "those cards" gave way gave way to ribbons and lace!"

I've always loved Christmas, but I'm happy to work on other occasion cards now.

This first one is a Happy New Year card for a dear friend of mine who's embarking on some life changing plans for 2011. I used this beautiful Art Journey Inchies stamp plate as the base, and added a couple inchies from Zorana's fabulous Etsy Shop (wings for FLYING!), and a couple of tiny scraps, one from wrapping paper and one from from my scrap box from a previous project. The sentiment stamp is also from the same Art Journey plate. This card was created to meet these challenges:

Art Journey challenge # 4: Christmas/New Year
Art Cards: Recycle your wrapping paper (top left punched circle)
Design Dollies: Layers and Layers
Alphabet Challenge: H is for Hats
I Did it Creations: Out with the old


This next card is for a friend who has a Christmas birthday. I used the Happy Birthday Dreamweaver stencil with glitter-covered Dreamweaver White Glossy Embossing Paste or the sentiment, and the card meets these challenges:

One Powerful Hour: Upcycle (I used this Nesties snowflake from a previous Christmas project)
Top Tip Challenge # 15: Get Embellishing
Think Ink Challenge # 34: Use punches and/or dies
Creative Card Crew: Christmas birthdays
Stampalicious: repurpose something

To adhere the Art Institute Glass Shards, I used Aleene’s® Original Tacky Glue (iLoveToCreate™) from a small plastic squeeze bottle with a #9 Squeeze Bottle Tip.


This card is for a friend's birthday too. This was fun to do, and such a different style for me. There's a coffee gift card in the inside pocket. I used four Impression Obsession stamps (the striped right design (cover-a-card stamp series, stamped vertically) both sentiments and the coffee cup) and a Hero Arts butterfly stamp. I created a mask with a piece 0f paper stamped with the butterfly stamp, then cut out, then I stamped the striped pattern over that. I used my stamp positioner, then stamped the front of the card with a half butterfly. Using Tulip ® Fashion Glitter Bond (iLoveToCreate™), I painted some of the butterly wings, then sprinkled Tulip ® Fashion Glitter (clear) over the adhesive.


This is for the Pile it On Challenge: It's all in the wrapping (gifts, gift cards, etc)


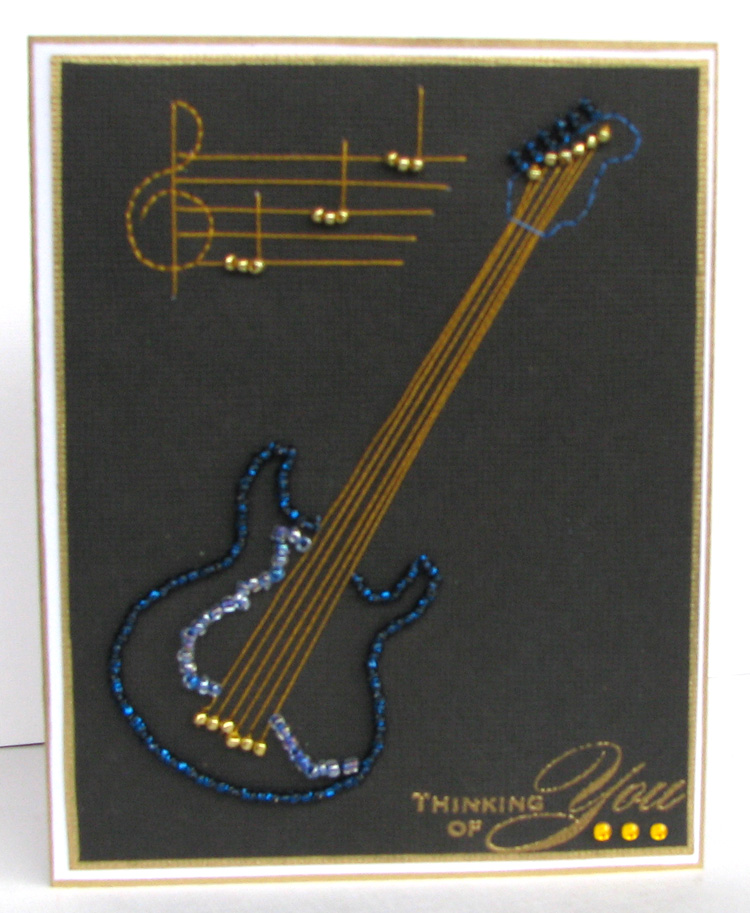
This final card is hand stitched and beaded, done to celebrate the early retirement of a friend, whose passion for the guitar will serve him well! I used three yellow Tulip® Glam it Up™ Iron On Crystals,™ glued on with Aleene's® Paper Glaze™, both by iLovetoCreate.™


Thanks SO MUCH for stopping by again! I sure appreciate it when you do.

Thursday, December 23, 2010

Becoming a habit...


Thursdays seem to be my day to post lately! December is always so busy, so I tend to save up all my cards and challenges and post them all together.

Today's Dreamweaver challenge is a free theme...don't you LOVE those!? I used this Dreamweaver stencil with Dreamweaver white glossy embossing paste, along with a Flowersoft image and several colours of Flowersoft. On the inside of the card, I stamped "Bon Voyage," and the card will go to a dear friend of mine celebrating travelling abroad on a fabulous holiday. The current Flower Soft challenge (FSC 17) is "Happy Holidays;" although this card isn't Christmas, it IS a holiday! ;) Papertake Weekly also has a free theme this week. I hope you can take a few minutes to visit the blogs of the other Dreamweaver designers. Their links are on my right sidebar. They all create such FABULOUS paper crafts that you will NOT want to miss these beauties! To adhere Flower Soft, I use Aleene’s® Original Tacky Glue (iLoveToCreate™) from a small plastic squeeze bottle with a #9 Squeeze Bottle Tip, which I always use for fine applications of glue.

This next card was created for these challenges: Created by Hand (green and red), Crazy Amigo (Christmas), Wee Memories # 36 (seasonal colours), Moxie Fab World (glitter is glam).
I used this Quietfire Design stamp with an Outlines stamp over a Spellbinders Nestability Lacy Squares die. I used Tulip® Glam it Up™ Iron On Crystals™ just below the sentiment, glued on with Aleene's® Paper Glaze™, both by iLovetoCreate™.


The current Wednesday Stamper challenge is to combine stamping with candles, and the current Fab and Funky challenge is quick and easy...which these candles sure ARE! I used this beautiful Quietire Design stamp for my candle, and paired it with a Normal Rockwell image. I added a tiny pewter angel charm made right here in Nova Scotia.


Well, that's it for today. I have a more Christmas cards to post tomorrow, in various stages of completion. Thank you so much for visiting. I wish you a delightful day, doing whatever you love best! HAPPY HOLIDAYS to you and yours!

Thursday, December 16, 2010

Tis the season!

Tis the season...to be busy...fa la la la la la la la la!!

Like so many folks at this time of year, the days are filled with hustle and bustle. I enjoy carving out some quiet "me-time" in my happy room, where the bustle just disappears for a few hours. Don't you LOVE these hobbies of ours!?

Over at Created by Hand, the challenge is to use the theme of meditation or the colour blue. The Moxie Fab World challenge is glitter with glam! The challenge at Creative Card Crew is an open theme. The Crazy Amigo challenge is winter. The Wednesday Stamper challenge is snowflakes. The Alphabet Challenge is G is for glitter. The SSD challenge is monochromatic. I matched stitching and stamping with an easel card ("these are a few of my favourite things, " lol) to create this card, using this beautiful Christmas stamp from Quietfire Design.


The Dream Scheme challenge over at the Dream it Up blog is to use blue and purple. The Lots to Do Challenge is glitz. Please drop by the blog and play in the challenge too! I used glossy blue embossing paste with this background stencil and this greeting and mauve cardstock. Please take a sec to click on the first image for a close-up. I did a little experiment: I mixed clear glitter in with some paste...and I just LOVE the effect! I've used glitter with paste before, but usually I paste first, let it dry, then reposition the stencil, glue, then glitter. This way, my three step process becomes a one step...happy day...will sure be doing THIS again!

I wanted you to see a close-up of this pretty little embellishment pin. I added a crystal and another pearl at the bottom, just to make it a little more festive for my card. I hope you take a few minutes to visit the other designers' blogs, I know you'll be tickled pink to see all their different ways of using Dreamweaver Stencils. You can get there from here...their blogs are all linked on my sidebar on the right.

Over at Impression Obsession, the challenge is "All that glistens is not gold," a challenge to use metallics. I painted this little wooden box with Lumiere metallic paint, then used this beautiful flourish stamp (H5575) with the Top Boss tinted embossing pad and Top Boss Copper Embossing powder. I just love this beautiful sentiment, and I was so pleased when Mitra over at Impression Obsession created a stamp with it. The mix of fonts... simply perfect. If you'd like to play in the Impression Obsession challenge for a chance to win a twenty-five dollar gift certificate in the IO shop, just check here, and be sure to take a little time with your morning cuppa to visit the other designers' blogs for some sumptious eye candy!


Now, have you played in the Etsy Inspired Challenge yet? If not, shuffle on over there! Challenge 118 brought us over to this fabulous Etsy shop, "Tzaddi," where there are the most WONDERFUL pieces of jewelry. Oh-my-oh-my-oh-my! You just HAVE to visit! I used a beautiful peacock pendant, for inspiration


paired with a sentiment stamp from Quietfire Design and a Hero Arts peacock stamp. I used sketch 94 from Card Patterns.


My last card is a recessed window card done for the Tuesday Taggers challenge: "stockings were hung." I used the Hero Arts handwritten Christmas stamp.


Well, that's my week in my happy room! Thanks so much for taking the time to stop by during YOUR very busy week! I wish you a delightful week, doing what you love best!

Thursday, December 9, 2010

Challenges again...

I LOVE challenges!

The current challenge Dream Scheme challenge is open, as is the challenge over at Creative Card Crew...my favourite! I used this Thank You stencil with glossy blue embossing paste, along with some hand beading and stitching, matched with one of Dreamweaver's 3 inch beaded pins. I hope you'll have time to stop by the other Dreamweaver designers' blogs (see sidebar)...always such beautiful things!


The current Created by Hand challenge is to use white to recognize a national day of remembrance and action against violence to women. I used this Quietfire Design stamp, with this Wrought Iron Dreamweaver embossing stencil and Dreamweaver black matte embossing paste, over dry embossed cardstock with this Cuttlebug Embossing Folder, from the Heritage set. Hope you'll stop by the other Quietfire designers' blogs to see their interpretations of this challenging theme. The Cute Card Thursday challenge is to use flowers.


Over at the Papertake Weekly challenge, and also over at Simon Says, the theme is to do something Christmas-y with no red and green. Here's my entry, using a Madonna and Child image and a gold embossed stamp from Cornish Heritage Farms.


Thanks so much or taking the time to stop by today! I wish you a wonderful day, doing what you enjoy best!

Thursday, December 2, 2010

Christmas...New Year's...love too...

The Impression Obsession challenge this week is to create a card that speaks to our New Year's resolutions. Well, given that I'm older than dirt, I've learned not to make those anymore (lol), BUT...if I did, it would be to step outside my comfort zone and try new card making techniques. This one is emboss resist, using Leigh Hannan's Flower background stamp, paired with a delightful sketch challenge from Wendy, one of the talented Dreamweaver designers. Here's Wendy's sketch:


and here's my interpretation ofher sketch, using Dreamweaver's Asian "Love" stencil as my sentiment, with glossy blue embossing paste and Navajo Sky Metallic FX. First, stamped the Impression Obsession image with clear embossing powder on glossy cardstock, then dipped it onto a Non Stick Craft Sheet which I'd sprayed with blue and green Ecoline Inks mixed with water and Winsor and Newton Iridescent Medium mixed in a Ranger Mini Mister. Then I paste embossed the stencil with the blue glossy embossing paste (again on glossy cardstock), removed the stencil, let it dry, then repositioned it and pounced Metallic FX over dabbed-on glue. I really like the sheen that the Metallic FX gives over the blue glossy paste. I cut that with a Spellbinders plain circle die, then mounted it over a blue panel cut with the same die, and white cardstock cut with a Spellbinders Lacey Circles die. I used some gold peel-offs for the corner embellishments. This card is in the post, along with a hand crafted Christmas present, to a long time, dear lady friend, who loves blue and white!

I hope you'll have time to visit the blogs of the other designers from Impression Obsession and Dreamweaver; you'll find links in my left hand sidebar...well worth a visit!

We'd love to have you join BOTH challenges. Click here for the current Dreamweaver challenge, where you'll have a chance to win a Dreamweaver stencil, and click here for the current Impression Obsession challenge, where you can win a gift certificate to spend for Impression Obsession stamps!

I'm also entering my card for these challenges:

Wee Memories (Challenge # 33 use ribbon)
Stampin for the Weekend (winter...this IO background stamp and these colours remind me of a crisp winter's day!)
Etsy Inspired Challenge ( I used the blues of this wonderful picture as inspiration)
Alphabet Challenge ("E" for embossing)
Charisma Cardz (one for the girls!)
City Crafter (Blue Christmas)

Thanks SO much for stopping by today! Hope you'll play in these challenges.

One more thing...just take three minutes with your cuppa, listen to THIS...Susan Boyle singing Leonard Cohen's Halleluja...oh my...and if you like that, listen to her sing "Do You Hear What I Hear..." what a GIFT she has...aahhh..."with a voice as big as the sea..."

One more...okay then! "Oh Come All Ye Faithful..." Take time...close your eyes...just listen...

Happy day y'all...

Thursday, November 25, 2010

Christmas...of course!


Today marks the inaugural "Thursday Dream Scheme" challenge for the Dreamweaver design team. Lynell gave us the challenge to create a Christmas card with a non-traditional colorway. In this instance that means no Christmas red or green and no maroon or forest green.

I decided to create to meet several other challenges from some of my favourite challenge blogs as well: Pile it On ("winter means..."); Stampin for the Weekend (winter); Secret Crafters (challenge # 110, create handmade Christmas gifts); Our Creative Corner (holiday 3-d project); Papertake Weekly (punched shapes/diecuts); Creative Cottage (untraditional Christmas colours); Fab and Funky (open theme); Moxie Fab World (photo inspiration, gingerbread snowflake...loved that white glittery design!); Paper Cutz Challenge # 58 (Christmas);

I started playing with the Christmas Ornament stencil, and once I was finished, my "card" turned into tiny Christmas ornaments for my mini tree...I LOVE these!! I used the double glitter technique. I taped double sided tape onto white cardstock, soaped the stencil, removed the top liner of the tape, positioning the stencil on the sticky tape. Then I poured glitters with a tiny spoon, rubber them in, and removed the stencil. Now I'm left with all this blank sticky space, so I poured more transparent glitter over all those sticky areas, rubbed it in, and after punching circles out for each ornament, I outlined them with Krylon gold leafing ink. Then I used the second smallest size of the lacey circles die from Spellbinders to cut coordinating cardstock. I hand beaded the pearls, glued them to the back of each little piece, using Aleene’s® Original Tacky Glue (iLoveToCreate™) from a small plastic squeeze bottle with a #9 Squeeze Bottle Tip, and this was the result. Just click on the pic for a close-up.
I'm in a Christmas paper ornament swap this year, so I've decided to create more of these for my swap partners. They're pretty, they're relatively flat, and they won't cost a fortune to mail. Wouldn't they look pretty too, just one on a Christmas card?

Thanks so much for taking the time to stop by today. Please do visit the other designers' blogs (listed at the right here). You KNOW they'll have a virtual FEAST of Christmas eye candy for you! I wish you a delightful day, doing what you love best!

Saturday, November 20, 2010

Aaaahhhh romance...


I did this card for a young friend who's feeling a bit disillusioned with romance these days. Haven't we all felt like that at one time or another? Well, I decided to work something up to meet some challenges, as usual. Art Journey # 3 challenge is romance...this is an interpretation of the all-too-real other side of the euphoria of romance. I haven't done a pop-up card in AGES, but the One Stop Craft challenge wanted just that, so it was REALLY a challenge to incorporate a pop-up with a serious card. But that's actually how I decided on the whole theme...serious, but hopeful. So THANKS for the inspiration ladies (even though I used LAST week's theme, lol). The Art Card challenge is to use other forms of cards...hence, again, the pop-up. The Charizma gals Challenge # 45 was "sympathy/sorry" cards. Over at the Sisterhood, we're challenged to create something about things we're thankful for...in this case, I'm thankful for HOPE! The Lots to Do challenge is to use a favourite technique. I think one of my "signatures" as a card maker is my Krylon Gold Leafing pen. I use it on nearly all the cards I make! I like the professionally finished look it provides. I glue the layers on my cards with Aleene’s® Crystal Clear Tacky Spray™ (iLoveToCreate™).

Louise from Art Journey in the Netherlands just sent me oodles and OODLES of stamps to play with (THANK YOU Louise!!), so I used some of them today. I've grown to LOVE these stamps...they have such a "unique" style to me, and take my card making in very different directions.

The outside of the card was done with this set, called "Men." Click and have a look...I just LOVE that eye stamp!! WOW!! And doesn't that fellow look just so sure of himself? (lol) Yep, I've definitely known men like THAT in my life!

So here's the outside of the card. I stamped simply with Ancient Page Coal Black Ink, and added a little colour to the eyes with blue chalk, and a teardrop crystal to an eye. I masked the sentiment and stamped part of it onto a punched out piece, using a McGill tab fold punch.


This dancing gal from the inside of the card is from the Silhouette set. It was great to incorporate some JOY into what might have been a too-sombre card! I used the other part of the sentiment (also masked) for the inside of the card.

THANKS for visiting today!

Wednesday, November 17, 2010

It's beginning to look a lot like Christmas!

This little box and matching tag were done for the current Impression Obsession designers' challenge, which is to use music from "My Favourite Things" from The Sound of Music as inspiration. (I've had it rolling 'round in my head ever since I started the project!) My inspiration was the line "brown paper packages tied up in string." I white embossed the snowflake Cover a Card stamp on brown paper to wrap my little box, and made a tiny gift tag to tuck into the side. I used Spellbinders Lacy Circles and the Creatabilities "Create a Flake 1" dies to make the top decoration, using gold embossing, gold mirri cardstock, and Barbara Trombley's Clear Glass Shards around the bottom snowflake. For the inside of the tag, I used this sentiment stamp from Impression Obsession. This was such a FUN project to do, and there really IS a Christmas gift inside, to be heading to England later this week. Creative Cottage challenged us to make something for somebody special for Christmas this week...this is mine! The Moxie Fab World Tuesday Trigger is "Moxie Chic" this week, and I've decided my wee package measures up to paper chic! I used this beautiful "Snow Necklace" from Happy Day Designs as my inspiration for the Etsy Inspired challenge. I used Tulip® Glam it Up™ Iron On Crystals™ on the stamped and embossed snowflakes, glued on with Aleene's® Paper Glaze™, both by iLovetoCreate™.

I use Aleene’s® Original Tacky Glue (iLoveToCreate™) from a small plastic squeeze bottle with a #9 Squeeze Bottle Tip to glue on Art Institute Glass Shards.


Just imagine the FUN you can have with this theme! Hope you'll play along with us! You have until 9pm EST Friday to share your Impression Obsession challenge card. All the information you need can be found here. You could win a $25 Impression Obsession gift certificate for yummy rubber! Please take a few minutes to see what treasures the other Impression Obsession designers have created; the links to their blogs are on the right.

This next one is a "joy fold" card done for the Created by Hand challenge this week, which is snowmen. I gold embossed this sentiment stamp from Quietfire Design and the snowman from Inkadinkado, paired with some very old and loved Christmas papers from K & Co, prompted by the Fab and Funky challenge this week, which is "Forget me not," and challenges us to use something old from our craft stash, and by the Wee Memories challenge # 31, which is to dust off some older patterned paper. I used Tulip® Glam it Up™ Iron On Crystals™ for the snowman's buttons, glued on with Aleene's® Paper Glaze™. ( both by iLovetoCreate™)


This card will be in the post to a special little grandson who LOVES winter! Grammie helped with these critters...ummm...living vicariously through snow people? (lol)


Thanks SO much for visiting today!

Wednesday, November 10, 2010

Twenty five years...

Oh my. Time has whizzed by. I did this card for my son's twenty-fifth birthday. It seems like only yesterday that he was a baby. Siiigh. I'm so blessed, and so grateful, to have such a good relationship with my son. We see one another often, and he still enjoys hangin' out with his Mum! (lol)

When I saw Godelieve's beautiful scraps card here, I knew I wanted to do something like that. I didn't have the diamond Spellbinders, more's the pity, so I cut 1 inch square scraps, necessity being the mother of invention. I wanted to create for the "corners" theme over at Created by Hand too, and clear embossed over black Versafine with this beautiful stamp from Quietfire Design for the front of the card, for the birthday theme over at Wee Memories, One Stop's theme of embossing, Sisterhood's birthday theme, and Our Creative Corner's gratitude theme.


Thanks so much for visiting today!

Tuesday, November 2, 2010

Hugs and fishes...


What FUN I had creating this card! I wanted something fun and funky to reflect the lighter side of love.

Fishing for LOVE (lol)...

I painted the surface with four different Lumiere metallic paints, let it dry, then stamped the fish and shells (on this fabulous unmounted set, from Art Journey in the Netherlands) with Ancient Page Coal Black Ink. I cut that panel and distressed it, then mounted it on an off-white base on which I'd computer generated the sentiment. Then, wanting to mimic waves, I masked the sentiment and stamped the swirls (Hero Arts) over top with Versamark and gold embossed them.

So...challenges:

Created by Hand (words of love or friendship)
Papertake Weekly (cards for men or boys)
Gingersnap Creations (challenge 74 use Versamark)
Moxie Fab World Tuesday Trigger (blue-blue-blue...living near the ocean, blues always evoke sea themes for me)
Wee Memories and One Stop (free theme)
Creative Cottage (use embossing)


Thanks so much for stopping by today!

Monday, November 1, 2010

It's a RED day!

By the end of my crafty time today, I realized how much I liked RED (lol). I'm enjoying creating papercraft samples for a local Michael's store here in Halifax, and it's always fun to combine that with blog challenges, where I find so much inspiration. There are some beautiful new Anna Griffin and K & Co Christmas papers in stock right now, so I'll be posting several papercrafts with those during the next few days.

I used damask paper on this card, which was created for the following challenges:

Created by Hand (theme is friendship or words of love; I gold embossed this beautiful calligraphy stamp from Quietfire Design)

Creative Cottage (use embossing)

Fab and Funky (keep it simple)

Moxie Fab World (use damask)


This one was done for the following challenges:

Art Journey (romance; I used two Art Journey stamps (the rose from this BEAUTIFUL new plate, and the hand from the Writing plate), a Hero Arts sentiment stamp, and a Stampin'Up script background stamp)

One Stop and Wee Memories challenges (free theme)

Our Creative Corner (a yummy pic for inspiration...beige and white predominate)

Isn't this May Arts ribbon GORGEOUS!? It's the most sumptious velvet!


This next card was SUCH fun to make! I used fabulous sketch # 87 from CPS (too bad I used the sketch from LAST week...lol...). The gold embossed sentiment stamp is from Hero Arts. I used red and white to meet the current Etsy inspired challenge, which was to choose something from this delightful Etsy shop as inspiration. This artist creates the most beautiful, whimsical art pieces! I used the red and off-white colour scheme from this print as my inspiration.


Here's another one with the luscious new Christmas papers and embellishments at Michael's. I used the layout/design of the Case Study challenge card posted for inspiration.


Thanks so very much for stopping by today! I wish you a creative week, doing what you love best!

Wednesday, October 27, 2010

Ghoulies and ghosties...


The Created by Hand challenge this week is spooky spiders OR monochromatic with a touch of black. I did this card with a Dreamweaver spider web stencil and a Dreamweaver spider stencil, white and gold Dreamweaver embossing paste, and this Quietfire Design sentiment stamp.

Over at Creative Card Crew and at Simon Says, the challenge is to use punches, which I did for the holes for my gold brads. Over at Papertake Weekly, the challenge is to incorporate glitter and shine. The Stampin' for the Weekend challenge is Halloween/Fall.


Thanks so much for visiting today!

Wednesday, October 20, 2010

FUN day!


Aaahh, there's little that makes me more pleased than a whole day in my happy room! I played with inks and pastes and stamps and stencils...retirement is great! I really enjoy making a list of challenges, and creating cards to meet several at a time.

Over at Wendy's blog, there's lots of Dreamweaver goodness going on! She has a two week challenge posted, and she's challenging everyone to use Dreamweaver products and make something amazing. If you link to her blog with your creation before November 4th., you could win FIVE Dreamweaver stencils! Have a look at the other designers' eye candy too; their links are on the sidebar on the right. So here's a card I did with Dreamweaver white matte embossing paste and a Dreamweaver stencil. I sprinkled some clear glitter over the paste while it was still wet. The stamped sentiment is Hero Arts. Creatilicious challenge # 15 is to use white and a little colour. The Crazy Amigo challenge is black and white. The challenge over at Wednesday Stamper is hearts. The challenge over at Our Creative Corner is to use at least three different embellishments. I used an old Making Memories square embellishment, a little heart in the centre of the first paste embossed square, and two crystals.

The Created by Hand challenge this week is music. Here's my entry, using this music stamp from Quietfire Design, stamped on a paper flower paired with a Hero Arts sentiment stamp.


Halloween cards are the challenges at several blog sites: Sisterhood, Creative Cottage, Fab 'n' Funky, One Stop, and Stampin' for the Weekend. I used an Inkadinkado stamp on this wonderful photograph taken by a friend. On the fence, I used a Dreamweaver embossing stencil and black matte paste to do the crows on the fence. The 3 Muses challenge this week is wings.


I did this card to play with the Impression Obsession designers! Their challenge this time is to use a favourite quote. Well, I have so many that I could never choose just one (lol), but since it's fall here in Nova Scotia, I thought I'd use this one by Percy Bysshe Shelley. I used this Impression Obsession cover-a-card "branches" stamp, along with a leaf and the quotation from this clear stamp set. Now don't forget, you could win twenty-five stampin' dollars to the Impression Obsession online store if you'd like to play! Details are right here. I sure hope you can take some time to visit the blogs of the other Impression Obsession designers. Their blogs are listed on my sidebar. They always have such fabulous eye candy to share!

The City Crafter challenge is to use colours of a photo of the Colosseum in Rome, and to create a card with a vintage feel. I was AWE STRUCK when we visited Rome last year, and the Colosseum was one of our very first day long excursions, so thanks for bringing back that memory for me! I stamped the trees with Versafine brown ink, then heat embossed with clear EP. Then I sponged on several Adirondack Inks to get the moon effect. I stamped and clear embossed the sentiment and the leaf, and used a Spellbinders die to cut the shape.

So, that ends my day of play for today. Once I was done, I baked several dozen chocolate cupcakes and decorated them for Halloween for the local sick kids' hospital party tomorrow. Inky play and chocolate...it doesn't get any better! (lol)

Thanks so much for visiting today. I'll visit YOU too if you leave a link. I wish you a wonderful day, doing whatever you love best!

Sunday, October 17, 2010

Dance...etc..

I LOVE this joyful stamp from Art Journey!

For this card, I created the background by spritzing distress inks on an acrylic block and stamping on watercolour paper with the block. You can read more about this (and watch a video!) on this post by Jennifer McGuire over at TwoPeas. Then I stamped the happy dancer with Versafine black ink, and the sentiment with Versamark and Ranger Seafoam White EP. I used a Hero Arts doily stamp in the upper right corner, and a wee piece of plumber's foil tape (dry embossed and painted) in the lower left corner. This card was created for the current Art Journey challenge, which is to use tape, the Gingersnap Creations challenge (use Versamark), the Wee Memories challenge, which is "anything that is celebrated," in this case, WOMEN!) and the Craft Challenge, which is to use more than one fold.


I used the same distress ink technique for this next card, for the Papertake Weekly challenge (use three of a kind). These are some of the new Art Journey stamps. I LOVE this rose, and decided to try it in yellow for a change. I did some light shading with yellow chalk after the inks were dry, just to add a little more depth to some of the petals.


Thanks so MUCH for stopping by today! I hope you're enjoying a creative, contented weekend.

Tuesday, October 5, 2010

Sing!

The Created by Hand challenge this week is to use the theme "long night moon" or the colour silver; the current Simon Says challenge the Stampin' for the Weekend challenge, and Our Creative Corner challenge are all autumn...my very favourite season of the year in Nova Scotia!

I just LOVE this flourished crow stamp from Quietfire Design, and even better, it comes as part of a set...YAHOO...more value for the stamping dollar! I paired it with this background moon, then stamped this Quietfire sentiment.

Thanks so much for stopping by, hope you're enjoying a wonderful autumn week!

Monday, October 4, 2010

Dreamweaver winner!

Thanks everyone, for playing in our Dream Team blog hop!

Soooo Ms. Diane H...please e-mail me your full name and postal address, as your comment, number 26, was chosen by random.org


Anonymous said...

Love all of your work! I would pick the wisteria stencil, black matte paste and ivy green f/x
Thanks
Diane H


If I don't hear from you within 24 hours, I'll choose another winner.


Friday, October 1, 2010

Dreamweaver Blog Hop...and CANDY!

This marks the first EVER blog hop for the brand new Dreamweaver design team! The hop will run for three days...Friday, Saturday and Sunday, and we promise to show you the most delightful ways to use these créme de la créme metal stencils! In addition, each person to leave a comment on each designer's blog will have the opportunity to win:

~ one stencil of YOUR choice from the fabulous collection over at Dreamweaver Stencils
~ one jar of embossing paste...again, YOUR choice
~ one pot of the brand new glittery yummy Metallic FX, YOUR choice

I've used Dreamweaver stencils for years and years, and never tire of their versatility! Here are some of the goodies I've created for the hop. This first one is a birthday card for a dear friend. I've used this Wisteria stencil, along with a border from Just Rite Stamps and a computer generated sentiment. I stencilled the colours with Tim Holtz Distress Inks from Ranger, then heat set till they were dry. Then I repositioned the stencil and paste embossed with Dreamweaver Translucent Embossing Paste, which lets colours shine through. I dry embossed the border with the Cuttlebug Swiss Dots embossing folder, and cut with Spellbinders Nestabilities Labels 8. I used the Card Patterns Sketch # 83 (turned upside-down) for this card, and I used some of the colours of this FABULOUS fabric bag over at Everything but the Kitchen Sink.


For this sympathy card, I simply paste embossed part of this sentiment stencil directly onto a photo taken by a very talented friend of mine (who practices medicine to feed his creative habits). I used black matte embossing paste for the sentiment. The photo (taken right here in Nova Scotia, in the Annapolis Valley) is so beautiful that the card really didn't need anything else as adornment.

This card combines two stencils, the snowflakes background (LJ 819) and the Happy Holidays sentiment (LM 249). The large background stencils are a whopping 4 1/4" by 5 1/2," and perfectly cover a standard A-4 sized card front. For the snowflakes, I paste embossed with white matte embossing paste, let it dry, repositioned the stencil, pounced on a very thin coating of ordinary white PVA glue with a sponge applicator, then sprinkled blue glitter all over. I used white matte embossing paste for the sentiment too. I used a Stampin' Up border punch at the bottom. This one is entered for this week's Craft Challenge over at Charisma Cardz, which is Christmas!


This Christmas card uses two stencils as well. I used the outer border of this stencil (LJ 858). I stencilled it first with Tim Holtz Broken China Ink from Ranger, and after it was completely dry, I repositioned the stencil and paste embossed over it with Translucent Embossing Paste, then removed the stencil and immediately sprinkled clear glitter over the wet paste. Then I used just a part of this Vertical Ornaments stencil (LL 468), which is 3 3/4" by 2 3/4," embossed with gold embossing paste, and again, immediately sprinkled gold glitter over the still wet paste.


This last project is a wooden tray I altered. I painted it first with ordinary black acrylic paint. Then I applied gold leafing to all outside borders, over adhesive. I let that settle a little, then sprayed it with Krylon Matte Finish Spray to protect it the leafing. Then I paste embossed just part of the very large "All That Jazz" stencil LJ 853 on the front and back tray edges with black matte embossing paste. Finally, I stamped and gold embossed this sentiment rubber stamp from Quietfire Design on the inside bottom of the tray.


I know it's difficult to see the stamped sentiment, but if you click on it, you'll see it much more clearly. These "Gentle Thoughts" stamps are manufactured from Suzanne Canon's beautiful hand calligraphy, over at Quietfire Design. So, that's it for my part of the Dreamweaver blog hop. Now, for some VERY important information! So, that's it for my part of the Dreamweaver blog hop. Now, for some VERY important information!

BLOG CANDY... HOW TO GET IT!
For EACH time you comment on all the different blogs, you need to choose a different stencilfrom the Dreamweaver site right here as a favorite, your favorite paste and your favorite Metallic F/X color...just in case you win more than once! At the end of the three days,each member of the Dream Team will choose a random entry to win and post it on their site by midnight of the next day October 4. You may comment ONCE on each designer's blog. Duplicate entries will be deleted.

YET ONE MORE OPPORTUNITY FOR CANDY
If you'd like an additional entry, you're invited to sign up to be followers of the brand new Dream it Up Blog, right here. Just toddle on over, sign up if you like, then be sure to post in the comments section over there that you've signed up. It's really important that you post a comment there so you're certain to get a second entry! So, with eleven designers, this gives you the potential of twenty-two chances to win! All winners will be selected by Random.org, and posted on each designer's blog by midnight Monday. Don't forget to include in your post: the stencil, paste, and Metallix FX powder you'd most like to win, and how you might use the stencil!Your next stop along the hop will be to visit Georgia's blog, right here! Each time you hop along to another blog, you'll get the next site on the hop map. We all hope you'll play along all weekend with us.

I'm participating in the second Art Journey challenge today too, with this card. Although the challenge isn't related to the blog hop, I usually try to fit all my postings for one particular day into the same space. The challenge (set by Godelieve) is to use tape. I used plumber's foil tape, dry embossed with a Cuttlebug border folder, painted it, then sanded it. I hoped it might mimic waves. :-) For the background, I did a watercolour wash with a couple of Ecoline Inks on watercolour paper, hoping to mimic the sea. I computer generated the sentiment. Isn't this sea urchins stamp just so utterly FABULOUS!? It's a brand new one from Art Journey in the Netherlands, and it's so beautifully detailed that it stamps like a photo!


Thanks so much for stopping by again today. I LOVE reading what you think about what you see here, and I SO appreciate your taking the time visit and to comment! I wish you a wonderful weekend, doing whatever you love!